

Disassembling the crank of an electric bike (eBike) may require some basic tools and a few simple techniques, but even those without technical expertise can easily accomplish it. Before proceeding with crank removal, make sure to disconnect the eBike’s power source to ensure safety. This guide will provide a detailed description of how to disassemble the eBike’s crank without damaging the bicycle, in simple and understandable terms.
Tools Required:
1. Torque wrench
2. Crank puller
3. 8mm hex wrench
4. Screwdriver
5. Bicycle stand (optional but recommended for convenience)
Step 1: Preparation
Before you begin removing the crank, ensure that your electric bike is placed on a stable surface for operation. If you have a bicycle stand, it can be more convenient as it allows you to secure the bike in the air, making it easier to work on.
Step 2: Locate the Crank Screws
The crank is a component attached to the bike’s bottom bracket and is typically fastened with screws. Start by locating the crank screws, which are usually situated on the inner side of the crank arms near the bicycle frame. There is typically one screw for each crank.
Step 3: Prepare the Torque Wrench
Have an 8mm hex wrench ready, as this is the tool you will need to remove the crank screws.
Step 4: Loosen the Crank Screws
Insert the 8mm hex wrench into the head of the crank screw and turn it counterclockwise to loosen the screw. Note that on some bikes, you may need to remove a screw cap first before accessing the screw itself.
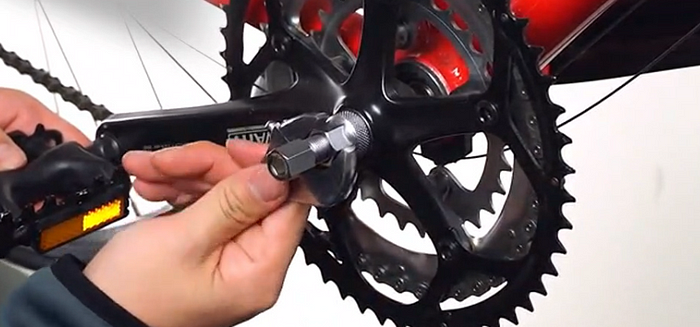
Step 5: Use the Crank Puller
Once the crank screws are loosened, you’ll need a crank puller to complete the removal. A crank puller is a specialized tool designed for removing cranks and can be purchased at a bicycle shop or online.

a. Insert one end of the crank puller into the crank screw hole.
b. Ensure the other end of the crank puller is connected to the bike’s bottom bracket.
c. Then, turn the crank puller counterclockwise until the crank starts to loosen.
Step 6: Gently Remove the Crank
Once the crank starts to loosen, you can easily take it off the bike’s bottom bracket. Be aware that some force may be required, but do not use excessive force to prevent damage to the bike or the crank.
Step 7: Repeat Steps 4 to 6
If your eBike has two cranks (usually on the left and right sides), repeat steps 4 to 6 to remove the other crank.
Step 8: Inspection and Maintenance
Once the crank is successfully removed, you can inspect it for cleaning or maintenance needs. You can also check any components on the bike’s bottom bracket to ensure they are not damaged or worn.
Step 9: Reinstall the Crank
If you wish to reinstall the crank, simply follow the reverse order of the above steps. Ensure the crank screws are properly tightened and use the crank puller to securely attach the crank to the bike’s bottom bracket.
Disassembling the crank of an eBike is not overly complicated as long as you have the right tools and follow the steps outlined above. However, if you are unsure or unfamiliar with these procedures, it is best to have a professional bike mechanic perform the work to ensure your electric bike remains undamaged. Safety always comes first!