

If you’re an American who has recently discovered the numerous benefits of owning an electric bike, you’re not alone. Electric bikes have made commuting, exercising, and leisurely rides in your neighborhood much easier for people of all ages.
However, there will come a time when you want to venture beyond your immediate surroundings on your e-bike. Whether you plan to take your family on a bike-filled vacation to a cabin, embark on a cross-country sightseeing trip with your partner, or even if you desire a solo ride in a remote area of your home state, there are various ways to travel with your electric bike. There may be other options in many cases than riding the entire distance to your destination. That’s where hitch bike racks come in handy. Hitch racks make transporting bikes much simpler.
Most hitch racks are designed to hold two or four full-sized bikes and can be attached to the hitch of your truck, SUV, or car. These racks allow you to free up space inside your vehicle to store other items or accommodate more passengers while ensuring the bikes remain safe and secure on the outside. Follow the concise guide below to learn how to install a hitch rack and expand your e-bike adventures.
The Step-by-Step Process of Installing a Hitch Rack:
Start by confirming that your vehicle is equipped with the appropriate hitch receiver. While many trucks and SUVs come with a hitch receiver, some do not. If your vehicle lacks a hitch receiver, you may need to purchase an aftermarket one and install it on your car or SUV.
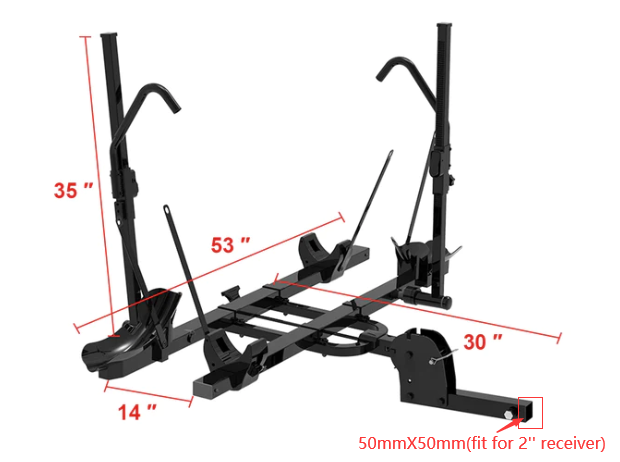
Determine the size of your hitch receiver. Hitch receivers are classified into five distinct classes, differentiated by their opening sizes. Class 1 and Class 2 hitches have 1.25-inch openings, while Class 3 and 4 have 2-inch openings. Class 5 hitches are specifically designed for heavy-duty commercial vehicles. If your hitch receiver is wider than your rack, you can purchase an adapter to increase the size of the rack shank that goes into the receiver.
Select the appropriate hitch bike rack for your hitch receiver and assemble the rack following the manufacturer’s instructions. Once assembled, lift the rack and load it into the hitch receiver. If you are prone to back injuries, it’s advisable to have a second person assist you in lifting the rack. Most racks weigh less than 50 pounds.
Align the bolt holes on your rack and receiver, then insert the hitch bolt provided with your rack. Use a wrench to tighten the bolt securely. The bolt should come with a lock washer and a flat washer. Additionally, some racks feature a “cotter pin” that should be inserted on the opposite end of the bolt from the head.
Before loading your bikes onto the rack, make any necessary adjustments to the rack itself. Be cautious not to damage your vehicle or bikes while positioning them. Tighten all straps and telescoping bar clamps securely over the frames or wheels. Push and pull firmly on the rack and bikes before driving to ensure everything is properly attached and locked.
Note: If you notice excessive bouncing or movement of your bikes and rack while driving, use a strap or cord to provide additional stability. Some play or movement is acceptable when encountering rough road conditions or turns.
The Benefits of Utilizing a Hitch Bike Rack:
Hitch bike racks offer enhanced versatility for your vacations, exercise routines, and transportation needs. Some parks or trails may be far from your home, requiring a vehicle to reach them. However, loading your bike inside your truck or SUV can be challenging and may cause damage to the vehicle’s interior. With an external hitch rack, you can easily take your e-bikes anywhere. Installing a hitch rack properly will allow you to enjoy your e-bike in various locations and environments.

BeeCool Hitch Rack:
The BeeCool E-bike Hitch Rack is an excellent companion for any e-bike enthusiast. This rack is compatible with Bee Adventurer, Explorer, Pathfinder, Pathfinder Step-Thru, Rambler, and Challenger models. It can accommodate two BeeCool models (like Bee Adventurer, Explorer, Pathfinder, and Pathfinder Step-Thru) or one BeeCool model (like Rambler and Challenger models) (as the Rambler or Challenger model is slightly heavier). One of the standout features of this bike rack is its ability to fold up and down into three different positions, providing easy storage and convenient access to your vehicle when the rack is not in use. The BeeCool E-bike Hitch Rack is lightweight, weighing about 45 pounds, and easily handled by anyone. However, if you have concerns about lifting or are older, having a second person assist you in moving the rack is also a good idea.
Removing the e-bike batteries before loading the bikes onto the rack is recommended for optimal safety. This precaution prevents the batteries from shifting and adding excessive weight to the rack during your journey. It’s important to note that this specific rack is designed for 2-inch receivers, so ensure you have the correct receiver (Class 3 or Class 4), as mentioned in Step 2 above. With the simple installation steps outlined above, planning a summer getaway with your e-bikes is not too late. A high-quality hitch rack, like the versatile offering from BeeCool, will provide you with endless travel options no matter where you decide to go!